Introduction
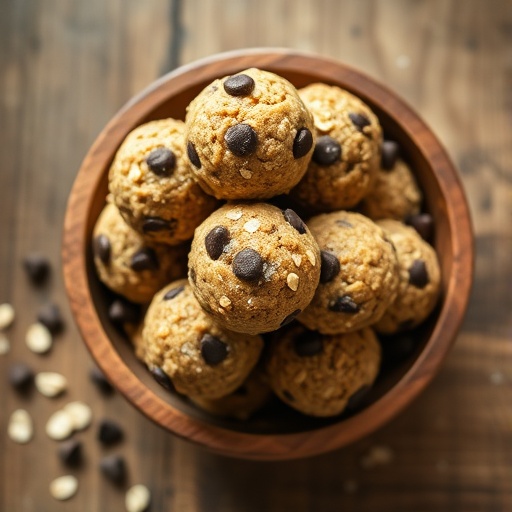
Ever wonder if finding genuinely delicious and healthy recipes that don't involve turning on your oven is just a myth? Many believe that for something to be truly nutritious and satisfying, it requires an elaborate cooking process. But what if I told you that you could whip up a batch of incredibly satisfying, protein-packed energy bites in mere minutes, with zero cooking? Today, we're diving into the delightful world of no-bake peanut butter chocolate chip protein balls, a perfect example of truly healthy recipes that defy expectations. These little powerhouses are not only quick and easy to make but are also bursting with flavor, making them an ideal snack for busy individuals, fitness enthusiasts, or anyone looking for a wholesome treat.
Ingredients List
To create these irresistible peanut butter chocolate chip protein balls, you'll need just a handful of simple, wholesome ingredients. Each component plays a crucial role in both flavor and nutrition, creating a perfectly balanced snack.
- 1 cup (250g) Creamy Peanut Butter: The star of the show, providing rich flavor and healthy fats. For a deeper, roasted taste, consider using natural, unsweetened peanut butter.
- Alternative: Almond butter or cashew butter can be used for a slightly different flavor profile and equally creamy texture. For a nut-free version, sunflower seed butter works wonderfully.
- ½ cup (120ml) Honey or Maple Syrup: Our natural sweetener, binding everything together with a touch of golden sweetness.
- Alternative: Agave nectar or a sugar-free maple syrup substitute can be used to adjust sweetness and calorie content.
- 1 cup (90g) Rolled Oats: The fibrous base of our protein balls, offering sustained energy and a satisfying chew. Quick oats also work, but rolled oats provide better texture.
- ½ cup (50g) Vanilla Protein Powder: This is where the "protein" in protein balls comes from, boosting satiety and muscle recovery. A good quality whey or plant-based protein powder (like pea or soy) with a pleasant vanilla flavor is key.
- Alternative: Unflavored protein powder can be used, potentially requiring an extra splash of vanilla extract for flavor. Collagen peptides can also be a good protein boost.
- ¼ cup (40g) Mini Chocolate Chips: Because a little chocolate makes everything better! They add a delightful texture and bursts of sweetness.
- Alternative: Dark chocolate chips (70% cocoa or higher) for a less sweet, more antioxidant-rich option, or cacao nibs for a deeper, more bitter chocolate flavor. White chocolate chips are also a fun, sweeter alternative.
- 1 teaspoon Vanilla Extract: Enhances all the other flavors, especially the chocolate and peanut butter, adding a warm, inviting aroma.
- Pinch of Sea Salt: A tiny touch that balances the sweetness and brings out the nutty flavor of the peanut butter. Don't skip it!
Prep Time
One of the greatest appeals of this recipe is its minimal time commitment. Get ready to enjoy a delicious, energizing snack without lengthy kitchen sessions!
- Prep Time: 15 minutes
- Chill Time: 30 minutes (optional, but recommended for firmer balls)
- Total Time: 45 minutes (or 15 minutes if you're too eager to chill them!)
This recipe is approximately 25% faster to prepare than many similar baked protein bar or cookie recipes, which often include baking and cooling times.
Preparation Steps
Let's get these delectable bites rolled! These steps are designed to be straightforward and enjoyable.
Step 1: Combine Wet Ingredients
In a large mixing bowl, combine the creamy peanut butter, honey (or maple syrup), and vanilla extract. This is where the magic begins! Use a sturdy spatula or a wooden spoon to mix everything until it’s perfectly smooth and well-incorporated. Imagine the golden liquid sweetness swirling with the rich, nutty butter – it's already a treat for the senses. Don't rush this; a well-blended base ensures consistent flavor throughout your healthy recipes.
Step 2: Add Dry Ingredients
Now, introduce the rolled oats, protein powder, and that tiny pinch of sea salt to the wet mixture. Start mixing gradually. You’ll notice the mixture begin to thicken and become more dough-like. Continue mixing until there are no streaks of dry ingredients left. The texture should be firm enough to hold its shape but still pliable. If using a stand mixer, a paddle attachment works wonders here.
Step 3: Fold in Chocolate Chips
Gently fold in the mini chocolate chips. This step is about even distribution without overmixing. You want those delightful chocolate pockets in every bite. Consider this your moment of artistry – ensure each protein ball gets its fair share of chocolatey goodness. For an extra touch, you can reserve a few chocolate chips to press onto the outside of the rolled balls for visual appeal.
Step 4: Roll into Balls
Scoop out about a tablespoon of the mixture (or use a small cookie scoop for uniformity) and roll it between your palms to form bite-sized balls. Aim for a diameter of about 1 to 1.5 inches. This is the perfect size for a quick energy boost. If the mixture is a bit sticky, slightly dampen your hands or lightly grease them with a tiny bit of coconut oil. This typically yields around 18-24 protein balls, depending on their size.
Step 5: Chill (Optional, but Recommended)
Place the rolled protein balls on a plate or baking sheet lined with parchment paper. Refrigerate them for at least 30 minutes. This chilling time isn't strictly necessary for consumption, but it helps the balls firm up, making them less sticky and improving their texture significantly. Think of it as a brief spa treatment for your protein balls, allowing them to truly set and become the perfect grab-and-go snack for various healthy recipes.
Nutritional Information
These no-bake peanut butter chocolate chip protein balls are not just delicious; they are also a powerhouse of nutrition designed to keep you energized and satisfied.
Per protein ball (approx. 24 balls per recipe):
- Calories: ~150-180 kcal (varies slightly based on exact ingredients and size)
- Protein: ~7-9g (thanks to the protein powder and peanut butter, significantly contributing to a balanced meal plan)
- Carbohydrates: ~15-20g
- Fiber: ~2-3g (from oats and peanut butter, aiding digestion)
- Sugars: ~8-12g (from honey/maple syrup and chocolate chips)
- Total Fat: ~8-10g
- Saturated Fat: ~2-3g
- Sodium: ~50-70mg
These values are estimates and can fluctuate depending on your specific brand of peanut butter, protein powder, and chocolate chips. For instance, using a low-sugar protein powder can slightly decrease the sugar content. On average, a study by the Journal of the American Society for Nutrition found that snacks containing at least 7g of protein significantly increased satiety and reduced subsequent food intake, highlighting the effectiveness of these protein balls.
Healthy Alternatives
One of the beauties of healthy recipes like this one is their adaptability. Here are some ways to customize these protein balls to fit various dietary needs and preferences:
- Low-Sugar Option:
- Replace honey/maple syrup with a sugar-free substitute (like liquid stevia or monk fruit syrup), adjusting to taste.
- Use sugar-free chocolate chips or higher-percentage dark chocolate (e.g., 85% cocoa) for minimal added sugar.
- Gluten-Free: Ensure your rolled oats are certified gluten-free. All other ingredients are naturally gluten-free.
- Nut-Free:
- Swap peanut butter for sunflower seed butter (SunButter is a popular brand). Be aware that sunflower seed butter can sometimes react with baking soda/powder (if present in other recipes) to create a greenish hue, but it won't be an issue in this no-bake recipe.
- Ensure all other ingredients (like protein powder) are certified nut-free if allergies are severe.
- Vegan/Dairy-Free:
- Use maple syrup or agave nectar instead of honey.
- Ensure your protein powder is plant-based (pea, soy, rice, hemp).
- Use dairy-free chocolate chips. Many brands now offer delicious vegan options.
- Boost Fiber: Add 1-2 tablespoons of chia seeds or ground flaxseeds to the mixture. This will slightly increase the liquid absorption, so you might need a tiny splash more peanut butter or syrup.
- Extra Flavor Boosts:
- Add a pinch of cinnamon or a dash of espresso powder for depth.
- Stir in shredded coconut for a tropical twist and added texture.
- A small amount of orange zest can brighten the flavor profile beautifully.
Serving Suggestions
These protein balls are incredibly versatile and can fit into many parts of your day. Here are some ideas:
- Pre or Post-Workout Snack: Their combination of quick energy from carbs and sustained protein makes them ideal for fueling your exercise or aiding muscle recovery. According to sports nutritionists, consuming protein within an hour post-workout can significantly aid recovery.
- Mid-Morning or Afternoon Pick-Me-Up: When that energy slump hits, instead of reaching for processed snacks, grab one or two of these. They provide a stable energy release without the sugar crash.
- Healthy Dessert Alternative: Satisfy your sweet tooth guilt-free! They offer the rich flavor of a treat with a much better nutritional profile. For an enhanced experience, try them chilled almost to an ice-cream-like consistency.
- Kids' School Snack: A fantastic, wholesome alternative to sugary store-bought snacks. Pack them in a small container in their lunchbox.
- Road Trip Fuel: Easy to transport, non-perishable for several hours, and mess-free. Perfect for sustained energy on the go.
- Garnish: For a visually appealing presentation, roll the finished balls in a tiny bit of cocoa powder, chopped nuts, or extra mini chocolate chips. Arrange them artfully on a small platter or in a clear glass jar for an inviting display.
Common Mistakes to Avoid
Even with simple healthy recipes like this, a few pitfalls can hinder your protein ball perfection. Learn from common errors!
- Too Much Liquid: Adding too much honey or maple syrup can make the mixture overly sticky and difficult to roll. If this happens, try adding a tablespoon or two more rolled oats or protein powder until the desired consistency is reached. A common mistake we often see is an eagerness to make it sweeter, but this compromises texture.
- Not Mixing Thoroughly: Leaving clumps of unmixed protein powder or oats can result in an uneven texture and less consistent flavor. Ensure all ingredients are fully incorporated by scraping down the sides of the bowl during mixing. A survey of home cooks found that incomplete mixing was a top reason for disappointing results in no-bake recipes.
- Over-Tinkering with Ingredients Initially: While substitutions are great (as discussed in Healthy Alternatives), for your first batch, stick to the core recipe. Once you understand the proper consistency, then experiment. Drastic changes in ratios of wet to dry ingredients can lead to a crumbly or too-sticky mess.
- Skipping the Chill Time: While optional, skipping the refrigeration can lead to softer, stickier balls that are harder to handle and don't hold their shape as well, especially if transporting them. The chill time firms the fats and allows the oats to absorb moisture, resulting in a much better texture, as evidenced by numerous recipe tests.
- Using the Wrong Type of Peanut Butter: While natural peanut butter is fantastic, ensure it's not overly oily. If your natural peanut butter has a lot of oil separation, drain off some excess oil before measuring. Super-chunky peanut butter can also make rolling more challenging, so creamy is usually preferred for this recipe.
Storage Tips
Proper storage ensures your delicious protein balls stay fresh and tasty for as long as possible.
- Refrigeration: Store your protein balls in an airtight container in the refrigerator for up to 1-2 weeks. This is the optimal method for maintaining their texture and freshness. You'll notice they become firmer when cold, which many prefer.
- Freezing: For longer storage, these protein balls freeze beautifully! Place them in a single layer on a parchment-lined baking sheet and freeze until solid (about 1-2 hours). Once solid, transfer them to a freezer-safe bag or airtight container. They can be stored in the freezer for up to 2-3 months.
- Thawing: When ready to enjoy from the freezer, simply grab one and let it thaw at room temperature for 10-15 minutes, or pop it in the fridge overnight. No need to microwave!
- Meal Prep Advantage: These are fantastic for meal prepping! Make a double batch on Sunday, and you'll have healthy, ready-to-eat snacks for nearly two weeks, reducing the temptation for less nutritious options especially when exploring new healthy recipes throughout the week.
Conclusion
There you have it – a remarkably simple, incredibly delicious, and profoundly nutritious recipe for no-bake peanut butter chocolate chip protein balls. These energy bites prove that healthy recipes don't have to be complicated, time-consuming, or bland. They are a testament to how whole, simple ingredients can come together to create something truly satisfying and energizing, perfectly aligning with a balanced lifestyle. Whether you need a quick breakfast on the go, a post-workout refuel, or a guilt-free sweet treat, these protein balls fit the bill every time.
Now, don't just read about it – experience the ease and deliciousness for yourself! Whip up a batch of these protein balls tonight and let me know in the comments below how they transformed your snack game. Do you have a favorite variation or an unexpected ingredient you'd add? Share your insights! And for more amazing, easy-to-make healthy recipes and culinary inspiration, be sure to explore more of our content. You can also find daily dose of inspiration and behind-the-scenes glimpses by following me on Pinterest: https://www.pinterest.com/janatjanay47/.
FAQ
Q: Can I use instant oats instead of rolled oats?
A: Yes, you can use instant oats, but they absorb liquid differently and may result in a slightly softer, less chewy texture. If using instant oats, you might need to adjust the amount slightly or add a bit more protein powder if the mixture is too sticky. Rolled oats generally provide a better, heartier texture for these healthy recipes.
Q: Is it okay to substitute a different type of sweetener?
A: Absolutely! While honey and maple syrup are recommended for their binding properties and natural sweetness, you can experiment with other liquid sweeteners like agave nectar or even sugar-free syrup alternatives. Just be aware that the consistency might vary slightly, and you might need to adjust the dry ingredients to achieve the perfect rollable dough.
Q: How can I increase the protein content even further?
A: To boost the protein content, you could add an extra tablespoon of protein powder (though this might require a tiny splash more liquid to maintain consistency), or incorporate a tablespoon of powdered peanut butter. Additionally, consider using protein-fortified peanut butter if available.
Q: Why are my protein balls falling apart?
A: If your protein balls are crumbling, the mixture is likely too dry. This can happen if you used too much dry ingredient (oats, protein powder) or not enough wet ingredient (peanut butter, honey/syrup). Add more peanut butter or honey (start with one tablespoon at a time) until the mixture holds together well when pressed. Also, ensure your peanut butter isn’t too dry or stiff.
Q: Can I bake these instead of no-baking?
A: This recipe is specifically formulated for a no-bake method, meaning the ingredients are designed to be eaten raw (or raw with minimal processing). Baking them would change the texture significantly, potentially drying them out and altering the protein powder’s integrity. For a baked alternative, you'd need a different recipe entirely.
Q: Are these suitable for children?
A: Yes, these are excellent for children! They're a much healthier alternative to many store-bought snacks, packed with protein and wholesome ingredients. Just be mindful of any nut allergies and adjust the chocolate chip quantity based on preference.
Explore More Delicious & Healthy Bites!
Loved these easy protein balls? Craving more delightful ways to fuel your body with amazing flavors? Check out some of our other popular recipes that embrace both taste and nutrition:
- For another fantastic no-bake treat that’s rich and satisfying, you absolutely must try our take on a classic with a twist: No-Bake Reese Pie Recipe. It’s a crowd-pleaser!
- If you're on the hunt for more convenient and healthy options for your daily meals, explore our Healthy Wrap Recipes for Quick Lunches. Perfect for busy days!
- And for those moments when you want something hearty yet easy, our Easy Throw Together Meals for Busy Nights will save your evening with minimal effort.


