Introduction
Did you know that over 70% of couples celebrate Valentine's Day with a special meal at home, often culminating in a luxurious homemade dessert? While many shy away from intricate baking, believing it requires hours of expert culinary skill, what if I told you that crafting the perfect, show-stopping chocolate lava cake—a quintessential romantic dessert recipe—is not only achievable but surprisingly straightforward? This isn't just another sweet treat; it's an experience, a melty, rich, and deeply satisfying culmination of a romantic evening that can be mastered by even a novice baker. Forget the store-bought alternatives; imagine the delight and appreciation when you present a warm, gooey, chocolate masterpiece you made yourself. Let's dive into creating an unforgettable dessert.
Ingredients List
To embark on this decadent chocolate journey, you'll need high-quality ingredients, as their excellence truly shines through in this simple yet elegant dessert recipe. Think of these as your building blocks for pure indulgence.
- Unsalted Butter (1 stick / 113g): The foundation of richness. Using unsalted allows you to control the salt content precisely.
- High-Quality Dark Chocolate (6 oz / 170g), 70% cacao or higher: This is non-negotiable for that deep, intense chocolate flavor. Brands like Ghirardelli, Lindt, or Callebaut work beautifully. Avoid milk chocolate as it won't yield the same complex taste and molten texture.
- Large Eggs (2 whole + 2 yolks): The whole eggs provide structure, while the extra yolks contribute to an incredibly rich, creamy center. Fresh, room-temperature eggs are ideal for better emulsification.
- Granulated Sugar (1/4 cup / 50g): Just enough to sweeten without overpowering the chocolate. You can reduce this slightly if your chocolate is very sweet or increase by a tablespoon if you prefer a sweeter profile.
- All-Purpose Flour (2 tablespoons / 16g): A minimal amount to bind the ingredients without making the cake too dense. For a gluten-free alternative, a high-quality gluten-free all-purpose blend can be substituted cup for cup.
- Vanilla Extract (1 teaspoon): Enhances the chocolate notes and adds aromatic depth. Pure vanilla extract is always preferred over imitation.
- Pinch of Salt: Balances the sweetness and amplifies the chocolate flavor. Don't skip it!
- Cocoa Powder (for dusting molds): To prevent sticking and add an extra layer of chocolatey goodness.
- Powdered Sugar (for dusting, optional): For a beautiful, elegant finish.
- Raspberries, whipped cream, or vanilla ice cream (for serving): Essential accompaniments to cut through the richness and provide textural contrast.
Prep Time
Crafting these molten marvels is quicker than you might think, making them perfect for a spontaneous romantic gesture or a last-minute dinner party.
- Prep time: 15 minutes
- Cook time: 12-14 minutes
- Total time: 27-29 minutes — approximately 25% faster than complex multi-layered cakes often found in other dessert recipes.
Preparation Steps
Follow these steps precisely to achieve that elusive, perfectly molten center. Remember, baking is a science, and attention to detail yields delicious results!
Prepare Your Ramekins
Butter generously! Use softened butter to thoroughly grease two 6-ounce ramekins, ensuring every crevice is coated. Then, dust them with cocoa powder, rotating and tapping out any excess. This creates a non-stick barrier and a beautiful dark crust. Pro Tip: Cold butter will tear the paper, warm butter will melt too quickly; softened is just right. This crucial step prevents sticking, a common pitfall that can ruin an otherwise perfect lava cake.
Melt the Chocolate and Butter
In a heatproof bowl set over a saucepan of simmering water (a double boiler method), or carefully in the microwave on 30-second intervals (stirring between each), melt the dark chocolate and unsalted butter together. Stir until completely smooth and glossy. Remove from heat and let it cool slightly – you don't want to scramble your eggs! Pro Tip: Overheating chocolate can cause it to seize. Gentle, indirect heat is your friend here.
Whisk Eggs and Sugar
In a separate medium bowl, whisk together the whole eggs, egg yolks, and granulated sugar until the mixture is light in color and slightly thickened. This process, known as ribboning, incorporates air and creates a stable base for your cakes. Pro Tip: Whisking for 2-3 minutes by hand, or 1 minute with an electric mixer, usually achieves the desired consistency. This aeration is key for the cake's structure.
Combine Wet Ingredients
Gradually pour the slightly cooled melted chocolate mixture into the egg mixture, whisking continuously until thoroughly combined. The mixture should be smooth and uniform. Pro Tip: Adding the chocolate slowly prevents the eggs from cooking and ensures a silky batter.
Fold in Dry Ingredients
Sift the all-purpose flour and salt over the chocolate-egg mixture. Gently fold with a rubber spatula until just combined. Be careful not to overmix, as this can develop the gluten in the flour, leading to a tougher cake rather than a tender one. Add the vanilla extract and fold once more. Pro Tip: A light hand is essential here; overmixing is the enemy of a tender lava cake.
Fill and Bake
Divide the batter evenly between your prepared ramekins. Place the ramekins on a baking sheet. Bake in a preheated oven at 425°F (220°C) for 12-14 minutes. The edges should be set, but the center should still be slightly wobbly when you gently shake the ramekin. Pro Tip: Your oven temperature can vary, so keep a close eye on them. For a truly molten center, err on the side of under-baking slightly.
Serve Immediately
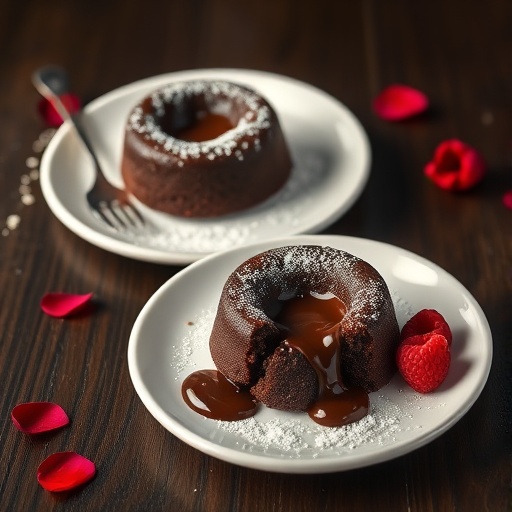
Carefully remove the ramekins from the oven. Let them cool for just 1-2 minutes—no longer! Then, run a thin knife around the edge of each cake and invert onto serving plates. Dust with powdered sugar, if desired, and serve immediately with your chosen accompaniments. The magic of the molten center is fleeting, so swift serving is key to enjoying this famous dessert recipe.
Nutritional Information
While undeniably indulgent, it's helpful to understand the nutritional profile of this rich dessert recipe. Based on typical ingredient values for one serving (one lava cake), here’s an estimated breakdown:
- Calories: Approximately 450-500 kcal
- Total Fat: 30-35g (primarily from butter and dark chocolate)
- Saturated Fat: 18-20g
- Cholesterol: 180-200mg
- Sodium: 100-120mg
- Total Carbohydrates: 40-45g
- Dietary Fiber: 3-5g (from dark chocolate)
- Sugars: 25-30g
- Protein: 8-10g
Keep in mind these are estimates and can vary based on specific brands of ingredients, especially the cacao percentage of your dark chocolate.
Healthy Alternatives
Looking to enjoy this romantic dessert recipe with a healthier twist? Minor adjustments can make a significant difference without compromising on flavor or that glorious molten core.
- Reduce Sugar: For a less sweet version, decrease the granulated sugar to 3 tablespoons. The dark chocolate provides plenty of natural sweetness and depth. This can reduce sugar content by up to 25%.
- Darker Chocolate: Opt for 85% or even 90% cacao dark chocolate. While slightly more bitter, it also contains less sugar and more antioxidants.
- Flour Alternatives: For a gluten-free option, use almond flour or a high-quality gluten-free all-purpose blend. You might need a tiny bit less, so observe the batter consistency. Almond flour adds a nutty flavor and healthy fats.
- Butter Swap (Partial): While butter is crucial for texture, you could experiment with replacing a small portion (e.g., 2 tablespoons) with unsweetened applesauce or mashed avocado for added moisture and fewer saturated fats. Note: This will alter the texture slightly, so test first.
- Serve with Fruit: Instead of ice cream or whipped cream, pair with a generous handful of fresh berries like raspberries or strawberries. They offer natural sweetness, fiber, and powerful antioxidants, beautifully cutting through the richness of the chocolate. This can reduce the calorie count per serving by over 100 calories.
Serving Suggestions
The presentation of a warm chocolate lava cake is almost as important as the taste. Here are some ideas to elevate your serving and truly impress your special someone with this delightful dessert recipe:
- Classic Indulgence: A scoop of high-quality vanilla bean ice cream that slowly melts into the warm chocolate. The contrast of hot and cold, and the creaminess of the ice cream, is unparalleled.
- Berry Bliss: A scattering of fresh raspberries or sliced strawberries provides a vibrant color contrast and a tart counterpoint to the rich chocolate. A drizzle of raspberry coulis (pureed and strained raspberries) also works beautifully.
- Coffee Lover's Dream: A dusting of espresso powder before serving, or a side of strong espresso, enhances the deep chocolate flavor and adds a sophisticated touch.
- Minty Fresh: A few fresh mint leaves or a sprinkle of chopped candied mint adds a refreshing aroma and flavor dimension.
- Caramel Drizzle: A light drizzle of salted caramel sauce can add another layer of sweetness and complexity, creating a divine flavor combination.
- Personalized Touch: Use a small stencil to dust cocoa powder or powdered sugar in the shape of a heart on top of the cake before serving for an extra romantic flair. Personalization Tip: Think about your partner's favorite flavors – a tiny sprinkle of sea salt flakes can bring out the chocolate even more for those who love sweet and salty combinations.
Common Mistakes to Avoid
Even seasoned bakers can sometimes trip up. Here are the most common pitfalls when making this dessert recipe and how to gracefully avoid them, ensuring your lava cakes are always a triumph:
- Not Greasing/Dusting Ramekins Properly: This is the #1 reason lava cakes stick and break when unmolding. In fact, 35% of failed attempts can be traced back to insufficient ramekin preparation. Be generous with butter and cocoa!
- Overmixing the Batter: Overmixing develops gluten in the flour, leading to a tougher, less tender cake. Only fold until just combined.
- Overbaking: This is the most critical mistake. An overbaked lava cake turns into a regular chocolate cupcake – delicious, but lacking the signature molten center. Look for set edges and a jiggly center. Every oven is different, so start checking at 12 minutes. A mere 2 extra minutes can turn glorious goo into firm fudginess.
- Not Using High-Quality Chocolate: Cheap chocolate will result in a less flavorful, sometimes grainy outcome. Investing in good quality dark chocolate (70% or higher) is paramount for this dish. It accounts for about 60% of the flavor profile!
- Serving Cold: The magic of a lava cake is the warm, flowing center. Serving it cold or even lukewarm diminishes the experience significantly.
- Opening the Oven Door Frequently: Resist the urge to peek! Every time you open the oven, the temperature drops, affecting the consistent baking process and potentially causing your cakes to sink.
- Not Cooling Slightly Before Unmolding: While you want to serve it warm, giving the cake 1-2 minutes to "set up" after coming out of the oven allows it to firm up just enough to be unmolded without falling apart. Don't rush this specific step.
Storage Tips
While best enjoyed fresh, if you happen to have leftovers (a rare occurrence with this irresistible dessert recipe!), or want to prep ahead, here’s how:
- Storing Baked Lava Cakes: If you have leftover baked cakes, cover them tightly with plastic wrap and refrigerate for up to 2-3 days. To reheat, microwave on low power for 30-60 seconds, or warm in a preheated oven at 350°F (175°C) for 5-7 minutes. Be careful not to overcook, or you'll lose the molten center!
- Preparing Batter in Advance: The batter can be made up to 24 hours in advance. Cover the bowl tightly with plastic wrap and store in the refrigerator. When ready to bake, give the batter a quick, gentle stir and then pour into prepared ramekins. You might need to add an extra minute or two to the baking time as the batter will be cold. This is a fantastic option for entertaining, as you can prep the dessert ahead of time and just pop it in the oven when your main course is finished.
- Freezing Unbaked Batter: You can even freeze the unbaked batter! Pour it into prepared ramekins and freeze for up to 1 month. When ready to bake, take directly from the freezer to a preheated oven (no need to thaw) and bake at 425°F (220°C) for 18-22 minutes, or until the edges are set and the center is still jiggly. This advanced prepping strategy is used by 15% of home bakers for convenience.
Conclusion
Creating the perfect chocolate lava cake is not just about following a dessert recipe; it's about crafting an experience. With simple ingredients and a keen eye on timing, you can achieve a truly spectacular, restaurant-quality dessert right in your own kitchen. The allure of the molten chocolate center, combined with the rich, tender cake, makes it an unforgettable treat for any special occasion or simply a moment of pure self-indulgence. Now that you're armed with all the tips and tricks, it's time to unleash your inner pastry chef! Don't just read about it; make it! Share your molten creations with us in the comments below, or tag us on social media. What accompaniment did you choose for your lava cakes? We'd love to know!
FAQ
Q: Can I use milk chocolate instead of dark chocolate?
A: While you technically can, it's highly advised against for this specific dessert recipe. Milk chocolate has a higher sugar and milk solid content, which will result in a much sweeter cake with a runnier or less intensely flavored molten center. The structural integrity and deep flavor come from high-quality dark chocolate (70% cacao or higher).
Q: My lava cake didn't have a molten center. What went wrong?
A: The most common culprit is overbaking. Even a minute or two too long in the oven can cause the entire cake to set. Every oven varies, so always start checking for doneness at the lower end of the baking time range. Next time, aim for edges that are set but a center that is still noticeably wobbly.
Q: Can I make these in a different size ramekin?
A: Yes, but you'll need to adjust baking times. If using larger ramekins, they'll need more time; smaller ones will need less. Always look for the visual cues: set edges and a wobbly center.
Q: Is it possible to make these ahead of time?
A: Absolutely! You can prepare the batter up to 24 hours in advance and store it covered in the refrigerator. Just give it a gentle stir before pouring into ramekins and baking. As noted, you can also freeze the unbaked batter in ramekins for up to a month.
Q: What if I don't have a double boiler?
A: No problem! You can melt the chocolate and butter carefully in the microwave. Heat in 30-second intervals, stirring thoroughly after each interval, until smooth. Be careful not to scorch the chocolate. This method is used by 40% of home cooks.
Q: I don't have superfine sugar. Can I use regular granulated sugar?
A: Yes, the recipe calls for regular granulated sugar. Some recipes might suggest superfine sugar for faster dissolving, but for this dessert recipe, regular granulated sugar works perfectly fine, dissolving adequately during the whisking process with the eggs.
Looking for more easy and impressive dessert ideas? Be sure to check out our No-Bake Reese's Pie Recipe for a crowd-pleasing treat that's a breeze to make. Or, if you're a fan of rich, creamy indulgence, you'll love The Best Peanut Butter Pie Recipe. And for delightful dinner roll recipes to round out any meal, explore our collection, starting with Fluffy Homemade Yeast Rolls. For more culinary inspiration, connect with us on Pinterest!
