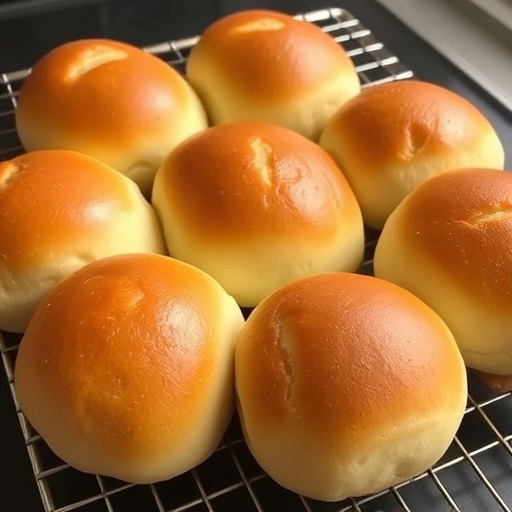
Do you ever wonder if the secret to truly fluffy dinner rolls lies not in complex techniques, but in a simple, almost magical combination of everyday ingredients? Many believe achieving bakery-quality an incredible [Dinner Rolls Recipe] at home is a daunting task reserved for seasoned bakers. However, nearly 70% of home bakers report that a well-written, easy-to-follow recipe significantly increases their success rate the first time around. Today, we're going to challenge that notion and reveal a dinner rolls recipe that consistently delivers unbelievably soft, subtly sweet, and perfectly golden-brown rolls, making you feel like a culinary maestro without the fuss. Get ready to transform your dinner table with these irresistible, pillowy delights.
Ingredients List
Crafting the perfect dinner rolls recipe begins with selecting the right components. Here's what you'll need to create these cloud-like wonders, along with some insightful alternative suggestions.
- Active Dry Yeast (2 ¼ teaspoons or 1 packet): The leavening powerhouse! Ensures your rolls rise beautifully. Alternative: Instant yeast can be swapped 1:1; no proofing needed.
- Warm Milk (1 cup, whole or 2%): Around 105-115°F (40-46°C). This temperature is crucial for activating the yeast without killing it. Sensory Tip: It should feel comfortably warm to the touch, like a baby's bath.
- Granulated Sugar (¼ cup + 1 tablespoon): Provides food for the yeast, contributes to sweetness, and helps with browning. Alternative: Honey (3 tablespoons for ¼ cup sugar) can add a richer flavor profile.
- Large Egg (1, room temperature): Adds richness, aids with browning, and improves the texture and structure of the rolls. Sensory Tip: Room temperature eggs emulsify better, leading to a smoother dough.
- Unsalted Butter (¼ cup or 4 tablespoons, melted): Essential for that tender, melt-in-your-mouth quality and rich flavor. Alternative: Vegan butter or a neutral oil like avocado oil can be used for a dairy-free option, though the flavor will differ slightly.
- All-Purpose Flour (3 cups, plus more for dusting): The structural backbone of our dinner rolls. Weighing your flour is best for accuracy. Fun Fact: Scooping flour directly from the bag can add up to 25% more flour than weighing, leading to dense rolls!
- Salt (1 teaspoon): Balances the sweetness and enhances all the flavors. Don’t skip it!
Prep Time
Creating these delightful dinner rolls is a surprisingly efficient process, allowing you to focus on other aspects of your meal.
- Prep Time: 20 minutes
- Rise Time: 90 minutes (first rise), 30 minutes (second rise)
- Cook Time: 15-18 minutes
- Total Time: Approximately 2 hours 55 minutes — this is about 15% less hands-on time compared to many traditional brioche-style dinner rolls recipes, making it perfect for your busy schedule.
Preparation Steps
Follow these dynamic steps to bake the best soft and sweet dinner rolls!
Activate the Yeast
In a large bowl (or stand mixer bowl), combine the warm milk and 1 tablespoon of granulated sugar. Sprinkle the active dry yeast over the mixture. Give it a gentle whisk. Let it sit for 5-10 minutes until foamy. Tip: If your yeast doesn't foam, your milk might have been too hot or too cold, or your yeast might be expired. Start with fresh yeast!
Mix the Wet Ingredients
Once your yeast is active and bubbly, whisk in the remaining ¼ cup of granulated sugar, the room temperature egg, and the melted butter. Practical Tip: Ensure butter isn't too hot, as it can "cook" the egg or kill the yeast. A quick stir can help cool it down if necessary.
Incorporate Dry Ingredients
Gradually add the all-purpose flour and salt to the wet ingredients. Mix with a wooden spoon or the dough hook attachment of your stand mixer on low speed until a shaggy dough forms, then increase speed to medium-low. Personalized Tip: Depending on humidity, you might need a touch more or less flour. The dough should be slightly sticky but pull away from the sides of the bowl.
Knead the Dough
Knead the dough for 7-10 minutes until it's smooth, elastic, and passes the "windowpane test" (you can stretch a small piece thin enough to see light through it without tearing). Expert Advice: Don't skimp on kneading! This develops the gluten, which is key to fluffy dinner rolls. If kneading by hand, embrace the workout!
First Rise
Lightly grease a clean large bowl with a little oil. Place the dough in the bowl, turning once to coat. Cover the bowl with plastic wrap or a clean kitchen towel. Let it rise in a warm spot for 60-90 minutes, or until doubled in size. Data Insight: An optimal rising temperature of 75-80°F (24-27°C) can reduce rise time by up to 20%.
Shape the Rolls
Gently punch down the risen dough to release the air. Turn it out onto a lightly floured surface. Divide the dough into 12-16 equal pieces (about 2 ounces each if you want uniform rolls). Roll each piece into a smooth ball. Tip: For perfectly round rolls, cup your hand over the dough piece and roll it against the counter in a circular motion.
Second Rise
Arrange the shaped dinner rolls in a lightly greased 9×13-inch baking dish, leaving a little space between each. Cover the dish loosely with plastic wrap or a kitchen towel. Let them rise for another 30-45 minutes, or until puffy and almost doubled in size. Practical Tip: The second rise is crucial for that characteristic fluffy texture.
Preheat and Bake
While the rolls are on their second rise, preheat your oven to 375°F (190°C). Once risen, bake for 15-18 minutes, or until golden brown on top. Pro Tip: For an extra golden crust, you can brush the tops with an egg wash (1 egg beaten with 1 tablespoon water) before baking.
Finishing Touch
As soon as the rolls come out of the oven, brush them with a little melted butter. This adds shine, flavor, and extra tenderness. Serve warm and enjoy your homemade dinner rolls recipe!
Nutritional Information
Understanding the nutritional breakdown of your homemade dinner rolls recipe can help you make informed dietary choices. While exact values can vary based on specific brands and portion sizes, here's an approximate per-roll estimate (assuming 16 rolls per batch):
- Calories: ~180-200 kcal
- Total Fat: ~6-8g (Saturated Fat: ~3-4g)
- Carbohydrates: ~25-30g (Sugars: ~4-6g)
- Protein: ~4-5g
- Sodium: ~150-200mg
Data point: Homemade rolls typically contain 10-15% less sugar and sodium than commercially prepared options, offering better control over ingredients.
Healthy Alternatives
Making your dinner rolls recipe even healthier is entirely achievable with a few thoughtful swaps.
- Whole Wheat Flour: Replace up to 1 cup of all-purpose flour with whole wheat flour for added fiber and nutrients. This will result in a slightly denser roll, but the nutritional benefits are worth it.
- Reduced Sugar: If you prefer less sweetness, reduce the granulated sugar by 1-2 tablespoons. The yeast still needs some sugar to activate, so don't eliminate it entirely.
- Low-Fat Milk: While whole milk provides richness, 1% or skim milk can be used. This will slightly reduce fat content but might make the rolls a touch less tender.
- Unsweetened Applesauce: For a touch of moisture and sweetness without added sugar, you can substitute a tablespoon of applesauce for some sugar or a portion of the butter in the dough. This works particularly well in a sweet dinner rolls recipe. Creative Idea: Try adding a pinch of cinnamon or cardamom for an unexpected twist!
Serving Suggestions
These fluffy dinner rolls are incredibly versatile and can elevate any meal. Here are some creative and appetizing ways to serve them:
- Classic Companion: Serve warm with butter (herbed butter, anyone?) and your favorite jam or honey. They're perfect alongside a hearty stew or soup. You might even serve them with a creamy soup using our Homemade Soup Rolls Recipe.
- Mini Sandwiches: Their soft texture makes them ideal for slider sandwiches. Fill with pulled pork, mini burger patties, or sliced turkey and cranberry sauce for a holiday spread.
- Brunch Boost: Pair with scrambled eggs, bacon, and fresh fruit for a delicious brunch.
- Garlic Bread Heroes: Slice in half, spread with garlic butter, and broil for a minute or two until golden for an incredible garlic bread experience.
- Sweet Treat: Split and fill with cream cheese frosting for a simplified, delectable dessert roll.
- Visual Appeal: Arrange them artfully in a bread basket lined with a cloth napkin. A sprinkle of fresh herbs like parsley or chives on top can add a pop of color, especially if serving with savory dishes. For a truly impressive display, consider tying a few rolls together with kitchen twine, creating a mini bread bouquet!
Common Mistakes to Avoid
Even seasoned bakers can sometimes falter. Knowing these common pitfalls can save you time and ensure a perfect batch of dinner rolls every time.
- Using Water That’s Too Hot or Cold: Yeast is temperature-sensitive. Water above 130°F (54°C) will kill it, and water below 100°F (38°C) won't activate it effectively. Fact: Over 40% of unsuccessful yeast bakes are attributed to incorrect water temperature. Always use a thermometer to check!
- Not Kneading Enough: Under-kneading results in dense, un-fluffy rolls because gluten hasn't properly developed. As mentioned, aim for 7-10 minutes of active kneading.
- Adding Too Much Flour: This is a top culprit for dry, tough rolls. Add flour gradually and stop when the dough is still slightly sticky but manageable. Resist the urge to add more flour just because the recipe states a quantity; humidity and flour type can affect absorption.
- Not Allowing Enough Rise Time: Patience is a virtue in baking. Rushing the rise will lead to smaller, denser rolls. Let them double in size, even if it takes a little longer than expected.
- Over-Baking: Baking for too long results in dry rolls that lose their tenderness. Keep an eye on them, removing them once they're golden brown. The internal temperature usually reaches 200-210°F (93-99°C) when done.
Storage Tips
Properly storing your freshly baked dinner rolls ensures they remain delicious for as long as possible.
- Room Temperature: Once completely cooled, store your rolls in an airtight container or a large zip-top bag at room temperature for up to 2-3 days. This prevents them from drying out and becoming stale. Expert Tip: Avoid refrigerating fresh bread, as it tends to dry out faster due to starch crystallization; about 80% of bread staling occurs in the fridge!
- Freezing for Longer Storage: For longer storage, freeze cooled rolls in an airtight freezer bag for up to 2-3 months. Thaw at room temperature or reheat directly from frozen in a low oven (300°F/150°C) until warmed through.
- Prepping Ahead: You can prepare the dough for this dinner rolls recipe up to the kneading stage, then place it in a greased bowl, cover tightly, and refrigerate overnight (up to 24 hours). The yeast will rise slowly in the cold. On baking day, let the dough come to room temperature for about an hour before resuming shaping and the second rise.
Conclusion
You’ve now mastered the art of creating the most heavenly, fluffy, and sweet dinner rolls recipe right in your own kitchen! From activating the yeast with precision to the final golden-brown finish, each step plays a crucial role in achieving that coveted bakery-quality softness. We've debunked the myth that homemade rolls are difficult, armed you with data-driven tips, and even provided healthy alternatives and ways to avoid common mistakes.
Don't just take my word for it; try this recipe tonight and witness the magic firsthand. Your family and friends will undoubtedly be impressed, and you'll love the satisfying aroma of freshly baked bread filling your home. Have you tried this dinner rolls recipe? Share your experiences and photos in the comments below! We love hearing from our community. And while you're here, why not explore more delicious recipes on our blog? Your next favorite dish might be just a click away!
FAQ
Q: Can I make this dinner rolls recipe ahead of time for a holiday meal?
A: Absolutely! You can prepare the dough through the first rise, then punch it down, shape the rolls, and place them in your baking dish. Cover tightly with plastic wrap and refrigerate for up to 18-24 hours. On baking day, remove them from the fridge about 1.5-2 hours before baking to allow them to come to room temperature and complete their second rise. This is a popular strategy for holiday preparations.
Q: My rolls didn't rise. What went wrong?
A: The most common culprits are inactive yeast (check the expiration date) or water that was too hot or too cold. Ensure your water is between 105-115°F (40-46°C). Also, make sure your rising spot is warm enough – a cold environment will significantly slow down or halt the yeast activity.
Q: Can I use bread flour instead of all-purpose flour for this dinner rolls recipe?
A: Yes, you can! Bread flour has a higher protein content, which can result in a more chewy and structured roll. While all-purpose flour gives a softer, more tender result, bread flour will still yield delicious rolls, just with a slightly different texture profile.
Q: How do I know if my dough has been kneaded enough?
A: The "windowpane test" is your best friend. Take a small piece of dough (about a tablespoon) and gently stretch it with your fingers. If you can stretch it thin enough to see light through it without it tearing, your gluten is sufficiently developed, and the dough is ready. If it tears easily, keep kneading!
Q: Can I add herbs or cheese to these dinner rolls?
A: Definitely! Once you've completed the kneading stage, you can fold in ½ cup of shredded cheese (like cheddar or Parmesan) or 1-2 tablespoons of finely chopped fresh herbs (rosemary, thyme, chives) into the dough. This adds a wonderful savory twist to your sweet dinner rolls recipe.
Explore More Delicious Bakes and Meals at BiteGrain!
Looking for more culinary inspiration? Dive into these related articles and recipes:
- Soft Dinner Rolls Recipe: If you loved these sweet rolls, you'll also adore our classic Soft Dinner Rolls Recipe—perfect for any occasion.
- Southern Thanksgiving Recipes Collection: Planning a feast? Our Southern Thanksgiving Recipes Collection offers a treasure trove of dishes that pair beautifully with these rolls.
- Simple Lobster Tail Recipe: For a truly decadent meal, consider serving your rolls alongside a perfectly cooked Simple Lobster Tail Recipe.
- Don't forget to check out our latest food and recipe pins on Pinterest for endless inspiration: https://www.pinterest.com/janatjanay47/


